Monday, May 31, 2010

TinyURL.com link shortener with custom naming feature

    Sometimes you want to give someone a link, whether in an email or on a webpage/blog but the link is either too long or ugly.  Try www.tinyurl.com, go to the site;


    Paste in a link from your clipboard.  My example is an Ebay page whose link has 127 characters, the fun part is the the "Custom Alias" feature which lets you name your link!  Here I have am using "green-glasses", all links begin with "http://tinyurl.com/" making my new custom link "http:/tinyurl.com/green-glasses".


My link went from 127 random characters to 32 hand picked, not bad!


    Now you can copy and paste your new custom named shortened link wherever you want!  TinyURL claim that their links will never break in an email and never expire!

    Chrome users may want to check out the goo.gl URL Shortener extension.  Unfortunately there is no custom naming ability, but no need to navigate to a new site either!

New features in Chrome

    When Chrome first came out I was pretty excited.  A faster browser that uses fewer resources!  I normally used Firefox, saving Internet Explorer for a couple of sites which do not work in Firefox, namely Microsoft Windows Updates and the Panasonic Toughbook Configurator site.
    Unfortunately, after trying Chrome a few times I stopped using it.  The problem was that at the time the browser did not support plug ins/ add ons/ widgets!  I was used to my Google toolbar with Spell Check, Auto Fill and the searchbars with the choice to search Google, Wikipedia, Amazon or Ebay.
    Well, Chrome has grown up! I'm using Chrome Beta as of May 2010.  It now supports plug ins called Extensions, and there some pretty cool ones!
   
     A Wikipedia Companion that opens up a little Wikipedia with search and Options


  Explain and Send Screenshots, image below which I covered in my post on Screenshots


 goo.glA built in URL shortener.  In true Google Minimalist fashon.  Click on it and  a tiny dialog bubble pops up, "Shortening..." and then your shortened URL in this case; http;//goo.gl/cP7u .


   No way to custom name your link, though which takes a lot of the fun out of it, for me!  I like www.tinyurl.com, but this one is fine if you don't care about naming the link and it is faster, since you don't need to navigate to the page.   There was a tinyurl plug in for firefox, but I could never get it to work right, or maybe it was the same problem with not being able to name the link...

    A weather applet, Gcast that never works, I keep it installed in hopes that it someday might!


    It has said that since I installed it.  I have my location in the correct boxes, it just doesn't work.  I guess maybe I should try uninstalling it and reinstalling it.

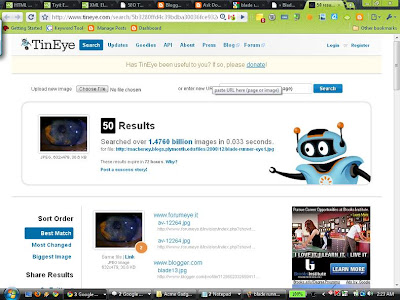
    There is also the very cool TinEye Reverse Image Search.  See an image on the web and wonder if there is a higher quality copy of the same image anywhere on the web?  Find your image online,


        Click on the Tin Eye icon on the toolbar,


    Click on the image you would like to search and a new browser window opens with your search results, I got 50 results for Harrison Fords eye in blade runner.


    Wading through these results resulted in a beautiful 720 by 480 shot, on a Ukrainian site!


    I had heard that image search technology was coming, but this is the best I have seen available to date.  If you have a picture of something you could use it instead of a search term.  The 50 results on my TinEye results page each had their own web page somehow referencing this seminal cinematic moment! 

    Oh, and don't worry you won't get stuck with an avcocado browser window in Chrome, that's just my Robots theme!
    To change your theme go to the Settings Wrench (Customize and control Google Chrome), Options, Personal Stuff, Themes: Get Themes. 

 This will take you to the Google Chrome Themes Gallery.

    You can choose from "Themes by Artists" or "Themes by Google"  just click apply theme and it will automatically download and apply!  No need even to restart Chrome!
    The official gallery site only has 150 or so themes at any one time, but you can also just perform a web search for Chrome Themes and you'll find plenty!

    Another cool Extension is called FastestChrome;  It adds a tiny quick search box when you select a word or phrase in your browser;

    Now you can just select and click on the Google or Wikipedia icon and search your term!  There are also some other weird search engines, WTF is Surf Canyon?  Duck Duck Go?
    Another very cool, must have feature of FastestChrome is the Endless Pages option which starts to load the next page of a web site when you near the bottom of a page! 


And it works great on most sites!!  It is actually a very nifty feature!


Sunday, May 30, 2010

Setting your computer for multi monitor output.

    Go to Start, Control Panel, Display (Personalization in Vista), Settings, select the big number 2, check the box,  "Extend the desktop to this monitor"


    This will set the computer to output to a second monitor.  If your monitor still does not display an extension of your desktop you now have to set your monitor to the be display the right input channel.  Is your receiver set to the proper line in?
    Some times you may need to restart the computer, external monitor, or both in different orders to get your hardware to detect each other but if your hardware is correct, and all the cables are the right type and in the right places it will eventually work.

Saturday, May 29, 2010

Media Player Classic with K-Lite Codecs

    My favorite Media Player, included with all the codecs you need to play just about any media you may run across on the web.  Plus DVD's.
    I like the Icons, I like the functionality, I like the controls.
    You can set it to automatically play all Video and or Audio files automatically or you can pick the file types individually.
    Once it is set up you might like to know how to use some of the controls.
    First if you want to play a number of separate files in a folder, say episodes of a t.v. show you will need to open Media Player Classic from the start menu. when it is open go to File, Open, Browse and open the containing folder.  Do not select any movies, or it will try to play them all at once!  To play all the moves just click open and the first movie will start to play.  You can also use this method to play both "CDs" of a movie that was stored as two 700mb CD size files without having to get up off the couch!
    One great feature Media Player Classic has an easy way to control the aspect ratio.  Occasionally I will get a file that wants to play in an incorrect aspect ratio.  Usually everything will be squished all tall and skinny from trying to fit a wide image into a smaller screen.

Squished


    The control is an easy one, just click the number 6 on your Number Pad, the phone type number pad on the right of most full size keyboards to widen the image.  Click 4 to narrow the image.

Better


    Most laptops don't have a separate number pad, sbut they usually do have a Function key Number Lock button at the top of the keyboard.  Look for a key labeled (usually in blue like the other function buttons) and some keys under it with numbers on them along with the regular numbers and letters.


I haven't touched windows Media Player in years, and even then I only used it for my music collection.  I hate that program!

K-Lite home;
http://www.codecguide.com/download_kl.htm

          32 bit link  http://codecguide.com/download_k-lite_codec_pack_full.htm                               

          64 bit link   http://codecguide.com/klcp_64bit.htm


Friday, May 28, 2010

How to capture a screenshot for your blog

    It took me a little practice to get good at capturing a screenshot and adding it to my blog, so I thought some of you might appreciate a couple of tips!

    I am using the PrtSc (Print Screen) button on my laptop to capture the screenshot.  This automatically Copies the visible part of the screen to your Clipboard.
    Next I open Paint and grab the select tool (the square dotted line on the left top of the sidebar), rightclick anywhere in the large white field and click paste.


    You will notice that the screenshot is surrounded by a dotted line (selected) while the image is selected go up to Image and click Crop.  This will keep the saved screenshot from having a large white border.
    Now is the time to make any extra comments or changes to the image like write comments.  I removed my email address using Paint's Eyedropper to pick the color, zoom in and use the Brush tool to paint out my email address.
    Your image is still too large to display  properly in a blogger window so I suggest you go back up to Image, Resize/Skew and type a percentage into both fields;


    This works to take an exact copy of what is currently visible on your screen. If you want to take capture the entire web page to save in an image format such as .jpg you can use the new Chrome Extension "Explain And Send Screenshots.

    There are options to " Grab visible part of this page"  "Grab a selected area" or "Grab the entire page"

    Notice the capture is a little different than the images captured using PrtSc.  Only the web page is visible, not all my tabs and Taskbar etc.  This my be better in some applications.  The ability to quickly comment on the page and to capture the entire page rather than just the visible part is also handy!

Process Explorer, Microsoft's Task Manager-zilla!


   Sysinternals Process Explorer is an advanced Task Manager with better descriptions and the ability to replace Task Manager when you click Ctrl. Alt. Del. or right click on the lower Taskbar!


   Where Task Manager tells me I have the process "avp.exe" running, I have to select and click Properties to see that it is my anti virus program, Kaspersky.  With Process Explorer all I have to do is scroll over and a descriptive paragraph pops up!


It's also got a nice graphical System Information window with ability to graph each processor separately.


You can learn a lot about your system and how Windows works by studying your system using Process Explorer.

Process Explorer at Wikipedia
http://en.wikipedia.org/wiki/Process_Explorer

Process Explorers user forum;
http://forum.sysinternals.com/topic10998.html

Authors site;
http://technet.microsoft.com/en-us/sysinternals/bb896653.aspx


Wednesday, May 26, 2010

Adobe Reader alternative


Sumatra PDF Viewer

    Replace the bloated Adobe Reader with this super slim PDF reader.  Fully portable it doesn't write to your registry, but you can set it to automatically open PDF files just like Adobe Reader.  Only 1.2MB!
   It is it has kind of ugly icons, but my computers start faster without Adobe repopulating itself in my startup list every time I remove it!
    One thing I have noticed is that it does not seem to integrate itself into my Chrome browser.  To open a PDF without downloading it I need to switch to Firefox.
    I have found Sumatra PDF Viewer to be a better, more stable Adobe Reader replacement than the more common Foxit PDF Reader.  I will only recommend software that I use!


Sumatra Screenshot


Adobe Screenshot

Sumatra Authors site;

http://blog.kowalczyk.info/software/sumatrapdf/index.html

Ammonia Absorption Icemaker article (PDF);

http://www.free-energy-info.co.uk/P13.pdf


Managing your Download folder

   
Managing your Download folder

    Ever download something and not know where it went?  In XP you can go to Start, My Computer, Local Disk (C), Downloads.  In Vista to get to the default Downloads folder go to Start, User Name, Downloads.
    If it didn't go there, and you are not sure where your downloads are set to go the only option is to bring up the Downloads Dialog Box and right click the download in question.  Then you can either click Open, which will run the program if it is an Executable, or Open Containing Folder, which will bring you to the folder in which your file is stored and highlight the Downloaded file (can be handy if the file name is not obvious or the Download Folder is large).
    But how do you bring up the Downloads Dialog Box?  Maybe I am slow, but for years the only way I could figure out to bring up the box was to navigate to a site which offered a download, click on it to start downloading and up would pop my Downloads Dialog Box.  A convoluted and time consuming method, there had to be a better way, and of course there is.
    In Firefox simply click on Tools in the Menu Bar at the very top of your browser and go to Downloads!  In Chrome go to the Customize and Control Google Chrome button (the little crescent wrench on the top right of your browser) and down to Downloads.


    To control where your Downloads go in the future, in Firefox click on Tools in the Menu Bar.  Go past Downloads down to click Options.
    In the General tab there are controls for Downloads.  You have several options.  You can check the box for [always] Save Files To:  Where the default is your Downloads file but you can use Browse to pick or even create another file, or you can click the box marked Always Ask Me Where To Save Files.


    In Chrome go up to the wrench on the top right of your browser (Customize And Control Google Chrome) pass up Downloads and go down to click Options, Click Minor Tweaks, or Under The Hood, if you are using Chrome Beta.  Scroll down and you will find the controls to either choose a Download folder or have the program ask you where to put each downloaded file separately. 


   Using these features should save you from ever losing a download in the bowels of your computer again!